

Happy Saturday!
I hope you all enjoyed your week so far ♥ Calgary has been a shit-show, weather-wise. Seriously. WHAT’S UP CALGARY. We’ve had a chinook almost every day and the weather has been super unpredictable #quitplayinggameswithmyheart. Just when you get a bit more sassy with the no-jacket-wearing, we get hit with a LOT of snow.
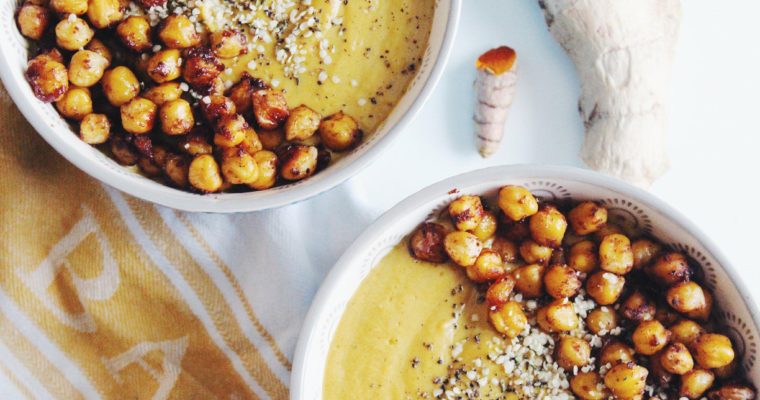
With all of these chilly (and unpredictable) days, my body was craving cozy & nourishing soup to keep me warm. I whipped up a batch of my Butternut Squash & Coconut Soup and it did not disappoint!

- 1 large butternut squash – peeled, chopped – no seeds
- 1-2 tbsp freshly grated ginger (use more if you wish! I used a lot in mine because I love ginger)
- 1 small bulb garlic- you will be baking the whole thing with your squash
- 1 yellow onion chopped into smaller chunks
- 1 tsp garlic powder
- 1 tbsp onion powder
- 2 tbsp olive oil
- 1 tsp cinnamon powder
- Fresh grated nutmeg (just a pinch or two!)
- 1 tsp turmeric powder – or just grate some fresh turmeric root
- 2-3 tbsp coconut oil
- Salt and pepper to taste (generous amount)
- 1-2 cups veggie broth (chicken broth also works if you’re not vegan)
- 2 cups thick full fat coconut milk
- Preheat oven to 325 degrees.
- In a large bowl, toss the peeled and chopped squash with some baking oil, salt and pepper.
- Line a pan with parchment paper and place the squash chunks on that. For the garlic, simply cut off the tips of a bulb and pour a bit of oil on top of the cloves. Then, cover lightly with tinfoil – shiny side facing in. Put this on the pan along with the squash.
- Bake for roughly 35-45 minutes, depending on the strength of your oven. Make sure you stir the squash chunks around every 10-15 minutes to prevent them from burning. This is the worst when it happens!
- When the squash is just about done, this is the time to prepare the pot.
- Heat up the coconut oil in a large pot over low-medium heat.
- Saute the yellow onion chunks until fragrant and transparent. Stir often to prevent burning.
- Add in the ginger, garlic powder, onion powder, cinnamon powder, nutmeg, and turmeric powder.
- Saute up until the spices are smelling damn good. The squash should be ready at this point. Take out of the oven and scoop into the pot. For the garlic, simply “squish” the cloves so that the garlic part literally comes out of the crispy shell. I will just add all of the garlic.. but I also love garlic. Add as many as you want!
- Saute everything up together for about 7-10 minutes, stirring constantly.
- Add broth and coconut milk. You can add 1-1 cups broth, depending on how creamy & thick you want your soup.
- Stir together until evenly hot. Then, take off heat (as well as turn down the heat!) and add soup to a high power blender that can HANDLE high heat. I use my vitamix and I love it! Blend everything together. Taste test and add more salt & pepper if needed.
- Add back into the pot and stir. Taste test once more.

This soup just hits the spot. Every time. I love adding toppings to my butternut squash soup such as hemp hearts or roasted garlic chickpeas. They are super easy to make too:
- Preheat oven to 300 degrees. (You can do a higher temp but oven’s vary so much person to person, so I like to play it safe!)
- In a large bowl, combine a few cups of cooked chickpeas (or 1 large can of drained chickpeas). Add in 2 tbsp onion powder, 1-2 tsp garlic powder, a few pinches of cinnamon powder, 1/2 tsp chili powder (optional), a bit of maple syrup, olive oil (or oil of choice – about 2-3 tbsp) and salt & pepper (add as much as you prefer). I like to taste test and then adjust accordingly.
- Then, mix it all up so the chickpeas are evenly coated. I like to use my hands as I find this the fastest and best way to get them allllll coated.
- Line a baking pan with parchment paper and pour chickpeas on top. Bake for 20-30 minutes depending on how crispy you want yours done. Make sure you stir them up every 5-8 minutes to prevent burning.
- Once you’re happy with the chickpeas, add them on top of your soup and enjoy!

I hope you all stay warm, during this super surprising snow storm (said no one, ever #Calgary #chinookseveryday)
Comment below if you try this soup out and remember to tag me on instagram @glowingholistichealth so I can see your amazing creations!
Marcy xx